 The kind folks at Outdoor
Products recently reached out to me to review their 30L Shasta Weather Defense
Backpack ($72/ 2 lbs 3 oz (much lighter if the waist belt and back panel
are removed)). My initial reaction was
that a backpack of this type, and one not commonly associated with the
lightweight backpacking cottage community, was likely not in my own interests
or that of my readers. However, the more
I thought about it, and reflecting on the tangible stagnation within the
lightweight community over the last few years, I decided to put my biases aside
and give it a shot to see where it may fit in to my gear closet.
The kind folks at Outdoor
Products recently reached out to me to review their 30L Shasta Weather Defense
Backpack ($72/ 2 lbs 3 oz (much lighter if the waist belt and back panel
are removed)). My initial reaction was
that a backpack of this type, and one not commonly associated with the
lightweight backpacking cottage community, was likely not in my own interests
or that of my readers. However, the more
I thought about it, and reflecting on the tangible stagnation within the
lightweight community over the last few years, I decided to put my biases aside
and give it a shot to see where it may fit in to my gear closet. on sleeves, waist packs, luggage, duffle bags,
outdoor kitchen gear (bowls, plates, utensils), trekking poles, carabineers,
tarps, containers, etc.
on sleeves, waist packs, luggage, duffle bags,
outdoor kitchen gear (bowls, plates, utensils), trekking poles, carabineers,
tarps, containers, etc.
In the nearly 15-years I’ve been associated with lightweight and ultralight
backpacking, I can honestly say that it has drawn more of my paycheck than I
ever could have imagined. The reason is
because I spent wildly on expensive gear long before I had sufficiently
developed my preferences and skills. The
mailman and I were on a first name basis for many of those years and my wife
will (un)happily recall many conversations where I defensively articulated that
I had returned a box that had just appeared on our doorstep as not to worry her
about my growing obsession. Of course,
she was smart enough to ask whether return shipping or a restocking fee was
included and that’s when I knew I’d be busy during the weekends ahead with my
growing honey-do list.

With this in mind, I try my best to give thoughtful responses when
asked about what gear to purchase by those thinking about getting into
lightweight backpacking. The answer is
usually fairly straight-forward for novices – go to Walmart. Purchases of top-end expensive tarps,
sleeping bags, backpacks, and stoves can be a significant investment, one that
shouldn’t be taken lightly and may not even be necessary for the casual weekend
warrior. The dirty little secret in the
lightweight backpacking community isn’t always the gear; it’s the knowledge to
fully appreciate what is truly necessary, to be a thoughtful planner, and to
exercise reasonable discretion. It is
with this in mind that I consider Outdoor
Products .
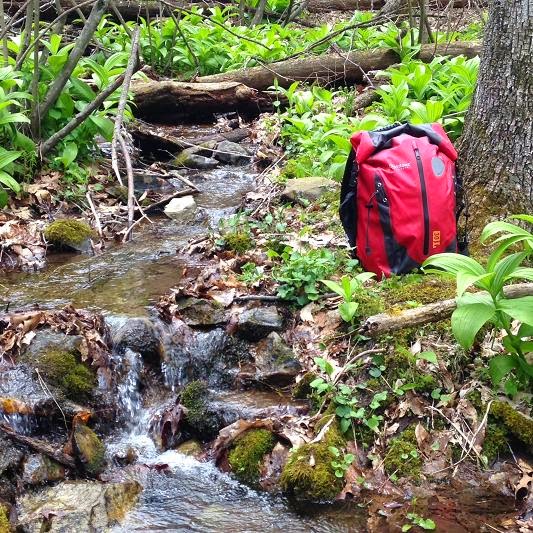
 The Shasta
Weather Defense Backpack is largely marketed as a day pack. Made of 420 denier fabric with TPU coating, the
pack is advertised as “water-resistant” and not “water-proof”. It has a roll-top closure with haul loop, welded
seams, articulated padded shoulder straps with sternum strap, a large front
pocket and even a trekking pole holder.
The padded back panel is fastened by Velcro and the waist strap can be
removed. Dimensionally, the pack is
20.5”x 10”x 10” which is identified as 1,654 cu/in. And for those insisting on making a fashion
statement in the great outdoors, it comes in risqué red or sophisticated black
– with reflective accents.
The Shasta
Weather Defense Backpack is largely marketed as a day pack. Made of 420 denier fabric with TPU coating, the
pack is advertised as “water-resistant” and not “water-proof”. It has a roll-top closure with haul loop, welded
seams, articulated padded shoulder straps with sternum strap, a large front
pocket and even a trekking pole holder.
The padded back panel is fastened by Velcro and the waist strap can be
removed. Dimensionally, the pack is
20.5”x 10”x 10” which is identified as 1,654 cu/in. And for those insisting on making a fashion
statement in the great outdoors, it comes in risqué red or sophisticated black
– with reflective accents.
At 1,654 cu/in, the Shasta Weather Defense
Backpack is very close to the 1,700 cu/in size of my Gossamer Gear Murmur
which is nearly double the price and doesn’t quite the water-resistance. Arguably, the Shasta Weather Defense
Backpack is far more durable and
offers better protection in the rain too.
For those of you thinking this may be too small of a backpack to carry
as anything other than a day pack, I’d personally disagree having used a pack
of this size exclusively during summer months on many outings. At 6’5”, most of my gear is larger than the
average person, so take this to mean that this little pack is big enough even
for big boy stuff – if you pack only what you need and you’re conscious of size
restrictions.

In the interests of transparency, I’ve got a wall full of backpacks. So why should I (you) care? Well, aside from being an excellent option
for someone looking for an affordable pack, the Shasta Weather Defense
Backpack offers far greater weather-protection and durability than other
more expensive light(er) weight backpacks.
This versatility allows me to be less concerned about keeping the contents
dry and also makes it my go-to pack for any activities associated with
water. My sons and I spend a lot of time
in our trusty canoe and having the Shasta Weather Defense
Backpack as a resource gives me great peace of mind. While engrained in me over the years to take
care of my gear, I also like the fact that I can head off trail with the Shasta Weather Defense
Backpack as I don’t need to be overly concerned with every twig in the
forest.
The roll-top closure is perfect for those of us who understand the
value of being able to adjust the length of the “throat” of the main
compartment as needed. Simply put, it’s
the best no-frills design and what I’d design personally if I were to make my
own pack. The external pocket comes with
a waterproof zipper and the pocket itself is larger than most top pockets and
is easier to access.
 Other than use the pack while backpacking and canoeing, I felt the Shasta Weather Defense
Backpack shined in two other situations.
First I’ve been long trying to find comfort in a hammock. It’s a love-hate relationship because I really
enjoy everything about it, but I just have trouble falling asleep. For those of you who use hammocks, you’ll
know that you need to make a decision on what to do with your pack. Do you lay it on the ground for it to get dirty
and possibly infested with bugs or animals?
Do you hang it from a tree and allow it to be exposed to the
weather. To you bring it into your
sleeping area and allow it to take over your personal space? Do you hang it from your suspension, ridge
line or bear bag and hope for the best?
For me, I’ve always hung mine on a tree.
Well, because the Shasta Weather Defense
Backpack has a roll-top and deals well with weather conditions, I don’t
need to worry either about the weather impacting it or the abrasion from the
tree. Secondly, I’ve been experimenting
with various Bushcraft techniques for the last 3 years or so. For those of you who walk in that world, you
likely carry a legit knife, saw and maybe even an axe (*gasp lightweight
backpackers*), and if you hunt or trap, you likely have various metal objects
that wouldn’t hold up well in a pack lacking robust construction. As the Shasta Weather Defense
Backpack is built for durability, it has held up well for these exercises
too.
Other than use the pack while backpacking and canoeing, I felt the Shasta Weather Defense
Backpack shined in two other situations.
First I’ve been long trying to find comfort in a hammock. It’s a love-hate relationship because I really
enjoy everything about it, but I just have trouble falling asleep. For those of you who use hammocks, you’ll
know that you need to make a decision on what to do with your pack. Do you lay it on the ground for it to get dirty
and possibly infested with bugs or animals?
Do you hang it from a tree and allow it to be exposed to the
weather. To you bring it into your
sleeping area and allow it to take over your personal space? Do you hang it from your suspension, ridge
line or bear bag and hope for the best?
For me, I’ve always hung mine on a tree.
Well, because the Shasta Weather Defense
Backpack has a roll-top and deals well with weather conditions, I don’t
need to worry either about the weather impacting it or the abrasion from the
tree. Secondly, I’ve been experimenting
with various Bushcraft techniques for the last 3 years or so. For those of you who walk in that world, you
likely carry a legit knife, saw and maybe even an axe (*gasp lightweight
backpackers*), and if you hunt or trap, you likely have various metal objects
that wouldn’t hold up well in a pack lacking robust construction. As the Shasta Weather Defense
Backpack is built for durability, it has held up well for these exercises
too. While most of this review seems pretty standard, I somewhat
unexpectedly identified an additional value of this pack. Because the back panel and waist belt are
removable, it allows the pack to sufficiently fit anyone in my family. To be fair, I need to remove the waist belt from
most non-custom packs anyway as it’s rare for an off-the-shelf design to allow
for a 24” spine length. What I didn’t
expect was being able to cinch/adjust all the bells and whistles to make it a
pack appropriate for my sons and my 5’6” wife.
Not wanting to spend the money on packs for family members who are
either growing or don’t head to the words frequently enough to justify their
own personal pack, the Shasta
Weather Defense Backpack is a great option.
I can think of few things in life which can fit a 6’5” man, a 7-year old
boy, and everyone in between. As a
father of two growing kids who will be educated on all things outdoors whether
they want to or not, having the flexibility of this piece of gear in my gear
closet is remarkable. For those of you
with children, I enjoyed watching my son’s face light up when he realized he’d
be wearing my pack and that it fit him too despite our obvious size difference.
While most of this review seems pretty standard, I somewhat
unexpectedly identified an additional value of this pack. Because the back panel and waist belt are
removable, it allows the pack to sufficiently fit anyone in my family. To be fair, I need to remove the waist belt from
most non-custom packs anyway as it’s rare for an off-the-shelf design to allow
for a 24” spine length. What I didn’t
expect was being able to cinch/adjust all the bells and whistles to make it a
pack appropriate for my sons and my 5’6” wife.
Not wanting to spend the money on packs for family members who are
either growing or don’t head to the words frequently enough to justify their
own personal pack, the Shasta
Weather Defense Backpack is a great option.
I can think of few things in life which can fit a 6’5” man, a 7-year old
boy, and everyone in between. As a
father of two growing kids who will be educated on all things outdoors whether
they want to or not, having the flexibility of this piece of gear in my gear
closet is remarkable. For those of you
with children, I enjoyed watching my son’s face light up when he realized he’d
be wearing my pack and that it fit him too despite our obvious size difference.
So is the Shasta
Weather Defense Backpack the perfect backpack? No. With
that said though, I’ve probably used or tried over 20 backpacks in the last
decade and I’d argue that none are perfect.
Most things in our society are designed for the average person. Unless the average person is built like an
offensive lineman, I’m not the average person.
As such, my areas of concern likely may not be shared.
First, the shoulder strap buckle hit me just above my armpit. This is because the shoulder straps are not
long enough, at least for someone my side.
This created a degree of discomfort in that area over longer hauls, but
oddly enough it’s something my body is somewhat familiar with because this is a
very common theme for me with most backpacks.
If the straps were made any longer, however, they’d lose some of the fit
versatility.
Second, since I remove the waist belt for the pack to fit me, the
fabric puckers at the lower part of the shoulder straps which connect to the
pack and rubs on my sides and back.
While this settled down the more I used the pack, I view this as a
design issue which can be remedied by relocating the termination point of the
shoulder straps.
 Bottom line, I felt the Shasta Weather Defense
Backpack was affordable, durable, exceptionally versatile and great for
family fun. Course I’d be remised if I
didn’t recommend the manufacturer offer green as a color option. As the “Jolly GREEN Giant”, this isn’t the
first time I’ve made this suggestion and it won’t be the last. Blending into the woods is GOOD! I’ve also heard that red attracts bears, so
it’s a color I generally avoid on the outside of my pack or clothing. Course, red is a great dual-use signal color
too. Either way, give the Shasta Weather Defense
Backpack a look.
Bottom line, I felt the Shasta Weather Defense
Backpack was affordable, durable, exceptionally versatile and great for
family fun. Course I’d be remised if I
didn’t recommend the manufacturer offer green as a color option. As the “Jolly GREEN Giant”, this isn’t the
first time I’ve made this suggestion and it won’t be the last. Blending into the woods is GOOD! I’ve also heard that red attracts bears, so
it’s a color I generally avoid on the outside of my pack or clothing. Course, red is a great dual-use signal color
too. Either way, give the Shasta Weather Defense
Backpack a look.
(Disclaimer: This product was
provided to me by the manufacturer free-of-charge for the purposes of this
review; however the information contained herein is offered without bias.)


